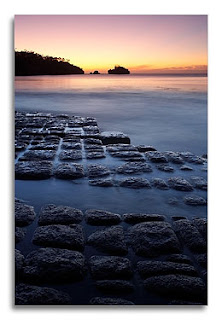
Watch that landscape horizon! ...as our brains are well accustomed to perceiving the horizon as level, regardless of the position or tilt of our heads.
So when we see a horizon off-level in an imaged, most of us react with a “something is not right here” feeling and this can turn an otherwise outstanding image into something quite ordinary for the viewer.
Naturally, our first chance to ensure a level horizon is at the time of capture. The landscape photographer simply needs to stop and look…. Sadly this is something that is not done often enough, as we tend to focus on other elements within the viewfinder rather than the distant horizon.Having said that, it is not as easy as it sounds. Compact cameras (film & digital) have never provided large viewfinders and the popular "non-full frame" DSLR cameras have viewfinders smaller than their film using or "full frame digital" SLR counterparts. This smaller view does not lend itself well to assessing the horizon, but luckily there are some aids to help the photographer.
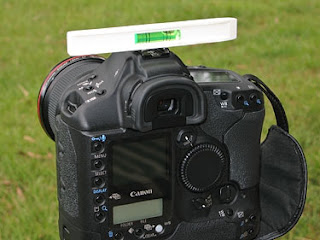
The Bubble Level
Yep, as simple as it sounds, that little bubble inside a liquid filled plastic tube can be a valuable tool to the photographer.... with careful use, horizons can be positioned very close to perfect, without the need to even look through the view finder.
Bubble levels are available from most camera stores (normally ordered in) and they are designed to slot into your camera's flash hot shoe. Both single and double levels are available, with the later useful for vertical orientated photographs. Be ready for a bit of a shock to the hip pocket though, as that that little bubble of air will set you back up to $75 Australian!!
A cheaper option is a small plastic level from your local hardware and this can be held across your hot shoe when required (The hot shoe is always a level part of your camera in relation to your film or sensor). This is not much good for vertical orientation or when you have no hot shoe, but generally there is something on your cam (like the edge of the LCD or even the camera itself) that can be used to position the level against. This is not as convenient as the true hot shoe level, but for the dollars saved it's worth the extra effort.
Viewfinder Grids
Some cameras have a grid etched into the focus screen and is visible through the viewfinder. These are great, as it's a simple matter of lining up your horizon to be parallel with the closest grid line.
If you don't have this, you may be able to have it installed on your SLR (www.brightscreen.com), or if you have a removable focus screen, it is a simple matter of popping out the old and popping in a new grid screen.
If you are using a compact camera you may have little choice here, but some digital compacts allow a "grid overlay" option and this electronically creates a grid on the LCD screen.
LCD screens on Digital Cams
Most DSLR cameras don't allow the LCD to be used as a viewfinder, but this is how many compact cameras operate. The often larger view provided by these is of great assistance in positioning the horizon, especially if you have the grid overlay function as mentioned above.
Focus Points
While this is not their intended use, the focus points visible through the viewfinder are positioned level and can be used to assist your composition.
Tripods
Tripods are invaluable in landscape photography, as they provide the photographer the ability to get it exactly right and leave it there! When using tripods, photographers tend to take a little more time with composition and this allows us to concentrate on individual elements within the view finder, rather than an "all at once" approach that is normal when hand holding the camera.
Plus many tripods and tripod heads come with built in bubble levels!!
So what about after the image is captured? How do we fix horizons then?
Well if you are shooting film and getting your images processed at the local mini-lab, your control may be limited. In the the old days of enlargers (where a light was shone through the negative to project an image on the paper below) it was a simple matter of adjusting the angle of the paper to suit.
More modern techniques of scanning and digital printing have removed the enlarger from most mini-labs these days, so in many cases your images are produced "as-is" in a largely automated process. Should you need an image modified in any way, it can be re-run on it's own (at a slightly higher price than the automated batch process originally done) with the operator applying the required adjustments, either in their print software, or by first opening the image in photo editing software like Photoshop.
Photoshop and/or it's cheaper sibling Photoshop Elements (there are more photo editing packages... please Google for info) is a must for any photographer who wished to take control and provide the lab with "print ready" images. This is especially so for those Photographers using digital, but just as relevant for film users having their images scanned.
Here are a few pointers for Photoshop leveling....
First of all we need to check that the horizon is actually straight, as lens characteristics can often bend straight lines and horizons... this is known as Curvilinear Distortion. There are two main types of curvilinear distortion that will be most obvious in our images (especially when wide angle lenses are used) and these are "barrel" and "pincushion" distortion.
As can be seen in the diagram, barrel distortion distorts in an outward fashion, while pincushion distorts inward.
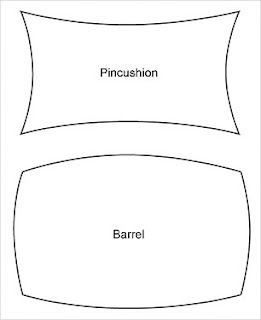 If your lens produces either of these distortions, you may find that your horizons are quite curved in appearance.
 If this is the case, you need to decide if it's something that degrades of enhances it. Personally I like to see straight horizons "most of the time" but sometimes when shooting wide angle, curved horizons can add to the wide effect and enhance the image's appeal.
So if you like it.... leave it! If you don't like it, then now is the time to fix it "before" any levelling is carried out.
How to fix it? Photoshop offers tools that can do just about anything, but I will admit to taking the easy road on this one and recommend that you purchase a copy of PTLens.
PTLens is a great program that makes distortion correction easy. .....Why muck around when someone has done all the hard work for you?
Now that you have fixed the distortion with PTLens you can move on to levelling that horizon and the easiest way that I have found is using Photoshop's "measure" tool.....
Step 1: Locate Photoshop's "Tool Pallette"
Step 2: Click and hold the "Eyedropper" tool
This will bring out a new selection of tools from the one button.
Step 3: Click on the "Measure" tool"
Step 4: Click and hold your cursor on the horizon, as far left in the image as possible.
Step 5: Drag while still holding the mouse button down, across to the horizon as far right as possible and release the mouse button.
 While doing this, you should have seen a line with 2 end crosses be created. This line should be directly over your existing "un-level" horizon. The reason I suggest measuring from far left to right, is that a measurement over a greater distance will be more accurate.
It will also allow for cases where the photographer has elected to keep curvilinear distortion in place, as effectively this method levels the "sides" and ignores the curve.
Step 6: Go to your Photoshop menu (up top of the Photoshop window) and select Image>>>Rotate Canvas>>Arbitrary
Now you should see a "Rotate Canvas" tool palette open and it will have an angle listed and either CW or CCW checked. Do NOT change this, as this is the angle of the line that your measure tool just created.
Step 7: Click OK
This will rotate the entire image by the listed the amount and your horizon will now be level. You will also notice that your canvas has grown, as Photoshop needed space to rotate the image into. This extra space can now be removed using the crop tool.
So there you have it, just a few simple clicks and you can adjust your horizon level in a VERY accurate way.
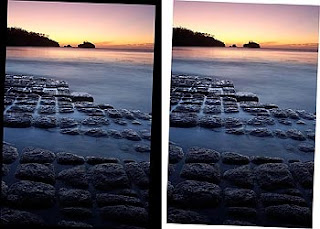 Tip 1: When Photoshop enlarges the canvas, it will use by default, the background colour as selected in your tools palette. If you are rotating an image with lots of dark areas you may wish to ensure that your background colour is set white, as this will allow you to see the image edge when cropping. Naturally, for light images a darker background colour works best.
This sample displays how the dark areas of the image are easily lost into the black canvas, while the white canvas makes it easy to see the image edge.
Tip 2: Don't work with your image too small on screen. A larger image will allow for more accurate use of the measure tool.
Tip 3: Try and get you horizon as close to level when taking your image, as the greater the correction required, the greater the image area lost to cropping.
Tip 4: It is possible to use an un-level horizon for dramatic effect with landscapes, just make them un-level enough for the viewer to understand that it is intentional. Too small an amount and the viewer is left in that grey area of "did the photographer mean to do this, or has the photographer simply stuffed up?" and that is a place we do not want our viewers to go!
Cheers
Rusty
Australian Digital Photo Of The Day: http://www.potd.com.au
Thankfully the insane prices that I mentioned above have finally come down....
Tags: photo photography photographic bubble level horizon spirit level


A quick and simple technique, another way the same result can be achieved is by using the 'crop' tool as it is also able to be rotated, this way you get to straighten and crop all in the one process without the need to select the cropping tool after using the eye-dropper. Either way, they are both simple solutions to a common problem. Cheers
ReplyDeleteLOL - I googled this question as I am having trouble with barrel distortion with Nikon 18-200 lens ... and look waht comes up in th etop 5! Thanks heaps Russ - have downloaded PTLens and hopefully all troubles are over! Looking forward to Bright and straight horizons! Gerry
ReplyDeleteGreat tips -- thanks for sharing the Photoshop secret for accurately rotating the canvas. I've been guessing at these things for years!
ReplyDelete